On-prem domains: Use provisioning packages to join devices
Administrators can use provisioning packages to add devices to on-prem domains. You can also use this process in hybrid domain environments. KACE recommends encrypting and signing these provisioning packages before using them in a production environment.
To create and deploy Windows provisioning packages:
- Create a Windows provisioning package.
For example, you can use the Microsoft Windows Configuration Designer to create encrypted provisioning packages (.ppkg files):
- Open MS Windows Configuration Designer, and start by completing one of the following steps, as applicable:
- Select an option to create an Advanced provisioning package.
- Open an existing project.
- In Windows Configuration Designer, navigate to Workplace > Enrollments.
- Add a UPN field and associate it with the email address of the user account selected for enrolling Windows devices.
NOTE: This account must be a local KACE Cloud account. SSO accounts cannot be used.
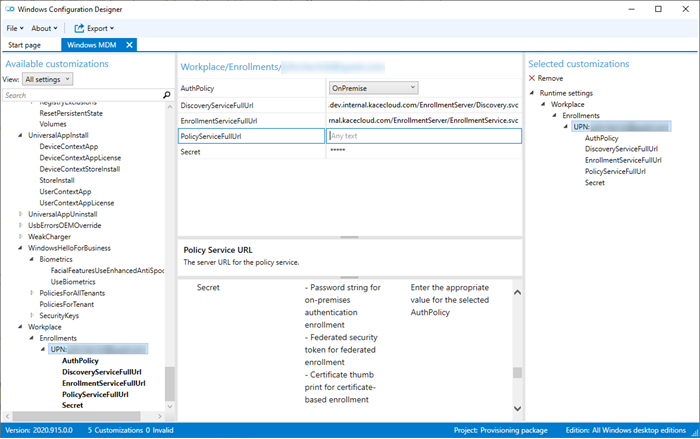
- Configure the following fields:
- AuthPolicy: Set it to OnPremise.
- DiscoveryServiceFullURL: Use the following syntax: https://<your.tenant.name>.enroll.kacecloud.com/EnrollmentServer/Discovery.svc
- EnrollmentServiceFullURL: Use the following syntax: https://<your.tenant.name>.enroll.kacecloud.com/EnrollmentServer/EnrollmentService.svc
- PolicyServiceFullURL: Leave this field blank.
- Secret: Specify the password for the enrollment account. The password can only contain alpha numeric characters, exclamation marks '!', dashes '-' and asterisks '*'.
For complete details about the Windows Configuration Designer, see https://docs.microsoft.com/en-us/windows/configuration/provisioning-packages/provisioning-install-icd.
- Open MS Windows Configuration Designer, and start by completing one of the following steps, as applicable:
- Deploy the newly created provisioning package to managed Windows devices.
You can run the generated .ppkg file on the device, or alternatively, use an automated deployment tool such as KACE SMA or KACE SDA:
- In KACE SMA, add the provisioning package to a KACE managed installation. For more information, see the KACE SMA Administrator Guide.
- In KACE SDA, add the provisioning package as a KACE post-installation task. For more information, see the KACE SDA Administrator Guide.